domingo, 28 de septiembre de 2014

DIY: how to reverse stamping, making your own stickers or water decals // DIY: como hacer un tatuaje de uñas de una estampación al revés


Hello sunshines!!

Today I'm going to talk about the reverse stamping, you can create your own stickers or water decals. You can make them little or for the full nail. It's so simple and easy and the final result is so cute. In this post i will have the collaboration of +CottonSugar Nail Art (@thecottonsugar)

what you need:
- polishes
- top coat
-stamping plate
- stamper
-tweezers

How to:

- First apply the polish into the stamping plate and take away the excess, then put the stamper on it and you have got the design.
- Paint the design as you desire, applying the colors you want. let it dry.
- Apply top coat on it and let it dry.
- Peel the stamper using the tweezers and apply the design on your nail, if it's little just apply it where you want it and if it's a full nail sticker peel it and clean the cuticules. Finally, apply top coat on the top of your nails and let it dry. And that's it, it's so simple right??? if you try this tip, let us know tagging us in your pics @instabeauty89 @thecottonsugar or putting the hashtag #instabeautycottonsugar. If you let me know i will feature you in my page.

I will post a video where you can see all the process. The video will be at the end of the post.

              ------------------------------------------------------------------------------------------

Hola a tod@s,

Hoy os traigo un post de "DIY" o hazlo tú mismo, vamos a crear un tatuaje de uña o sticker, es super sencillo y queda monísimo, podéis hacerlos pequeños o de la uña entera. En este post tengo la colaboración de +CottonSugar Nail Art (@thecottonsugar).

Que se necesita:

- esmaltes
- placa de estampar
-estampador
-pinzas de las cejas
- top coat

Como se hace:

- Aplicamos el esmalte en la placa de estampar y retiramos el exceso, posteriormente con el estampador recogemos el dibujo.
- Una vez que tenemos el dibujo en el estampador, podemos ir pintándolo como queramos con los esmaltes que tenemos y vamos dándole color al diseño. Dejamos secar.
- Aplicamos una capa de top coat y dejamos secar.
- Cogemos con las pinzas de las cejas el diseño que lo tendremos en el estampador y lo ponemos directamente en la uña, si es pequeño lo dejamos donde más nos juste y aplicamos top coat para que nos dure más puesto y quede más bonito. Si es un diseño de uña entera lo ponemos en la uña y limpiamos el exceso de las cutículas y el final de la uña, volvemos a aplicar una capa de top coat para fijarlo. Eso es todo, es muy sencillo, a que sí? si realizáis diseños con esta técnica y los queréis compartir con nosotras no dudéis en taggearnos @instabeauty89 @thecottonsugar o poniendo el hashtag #instabeautycottonsugar. Si lo compartís, os aseguráis un feature en mi página.

Aquí tenéis un video para que podáis ver el procedimiento:


jueves, 18 de septiembre de 2014

Aneley Cosmetics


Hello gorgeous!

Today i'm gonna speak about a natural brand of Cosmetics "Aneley Cosmetics" which products have no chemicals and are cruelty free. It's a recent brand created in 2003 by Yelenea Kalendareva, she is a licensed cosmetologist and pays lots of attention to the ingredients of her products. Her products has two variations Natural and Professional. The natural line contains absolutely zero chemicals, sulfates, parabens, phtalates, petrochemicals or dyes and the professional line contains no parabens. You can check out this brand on http://www.aneleycosmetics.com/.


Hola preciosuras!

Hoy os voy a hablar de una marca de cósmetica totalmente natural, sin químicos, llamada "Aneley Cosmetics". Es una marca reciente, creada en 2003 por Yelena Kalendareva, ella es una cosmetóloga licenciada y presta mucha atención a los ingredientes que contienen sus productos. Tienen dos variantes: la línea de cósmeticos natural que no contiene ni químicos, sulfatos, parabenos, petroquímicos... y la línea profesional no contiene parabenos. Podéis echar un vistazo a los productos en http://www.aneleycosmetics.com/.


Every purchase has a document that certifies the purchase and the products and also explains you the history of the brand and how was build. Its's a cute and unique thing. Makes you feel like a celebrity ;)

Cada paquete lleva un documento que además de certificar la compra y los productos nos explica la historia de la marca y como fue creada, es bastante único.


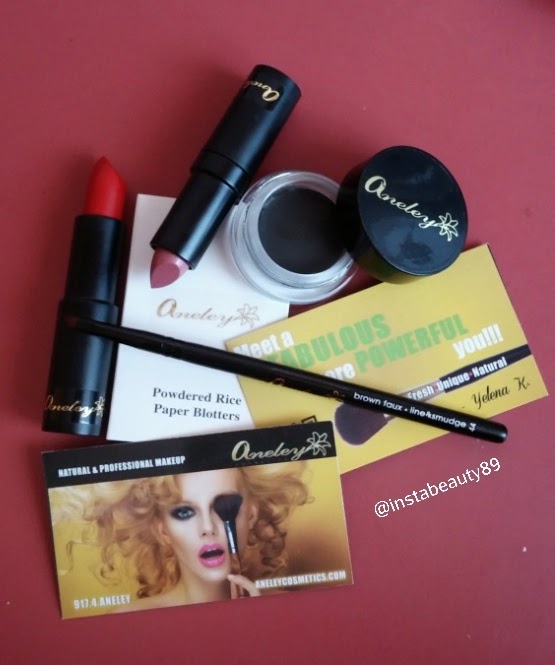
Let's talk about some of their products, first of all, the 2 lipsticks, one in "Sweet pea" which is a nude shade with a lil of glitter, really pretty and "red wine" which is a matte red, also so pretty! The package is really cute with a transparent box and a hole on the back to see the name of the lisptick, in the side you can read the name of the brand and the ingredients of the product. The quality is amazing they are so pigmented and smooth, and it last all day long.


Vamos a comentar ahora los pruductos, primero, os voy a hablar de los labiales, uno es "Sweet pea"  que es un nude precioso, es marroncito con destellos, super ponible y convinable, el otro es el "Red wine" que es un rojo mate muy bonito, perfecto para lucir un look pin up aún que lo puedes combinar con lo que sea. Ambos son super pigmentados y duran muchísimo puestos, son muy fáciles de aplicar puesto que se delizan perfectamente en el labio, no son nada pegajosos. La caja para guardarlos es muy diferente a cualquiera que hayáis visto, es transparente y abajo tiene un agujero para poder ver el nombre del labial y en el lado tenéis la marca y los ingredientes del mismo.


The eyeliner is a cream eyeliner and is really really pigmented, the black is so pure and pretty, you just apply a coat and you can go and rock your look for hours, it's a perfect formula because it last all day long and more. The package is basically the same of all the eyeliners in cream a pot full of the product, on top you have the brand and on the bottom you have all the ingredients. I usually use pen eyeliners because it's faster and easier but when i tried this cream eyeliner i was amazed so easy to work with. You can see how pretty is its black in the swatch.

El delineador es en crema, super pigmentado y el negro que tiene es mate, es un negro muy puro y bonito, aplicas únicamente una capa y ya puedes ir tranquila que vas a ir estupenda, su fórmula es perfecta y hace que dure todo el día intacto, y más si quisieras, cuesta quitarlo, incluso. El formato del delineador es básicamente el mismo que el de cualquier otra marca, es un bote que contiene el producto, arriba tenemos la marca y abajo los ingredientes. Yo normalmente utilizo un lápiz delineador para ir más rápido y por que es más fácil, pero este delineador en crema me ha sorprendido gratamente, es super fácil trabajar con él y queda divino. Pódeis ver el color en el "swatch".

The eyeliner brush "brown faux - liner & smudge 44" is an awesome brush for applying the cream eyeliner, it makes easier to do the line, it's not the typical eyeliner brush is like a pen and is so practical. You can achieve a professional look with it if you are not use to cream eyeliner you would love it because you can apply the line better. You can use it also to apply the lipstick on your lips, the aplication would be more accurate.

La brocha de delinear "brown faux - liner & smudge 44" es genial, sirve para aplicar el delineador en crema de manera más fácil, no es la tipica brocha de delinear es como un boli que te permite ser más preciso a la hora de aplicar el delineador, es mucho más práctico. Puedes conseguir un look increíble y profesional, aunque el maquillaje solo sea un hobby para ti. También se puede usar para aplicar el labial, os aseguro que va de muerte para ser más precisas a la hora de aplicar el pintalabios sobre todo si usáis colores potentes como el rojo, así podréis conseguir unos labios perfectos.


And finally,the powdered rice paper blotters, i have to say i never tried something similar, is for alleviating oil and shine from the face without taking our makeup. You just place the powdered side of the paper over the face and voilà it takes off all your oil and your skin is fresh and clean again. As you can see it's like a book, when you wanna use it take a paper and place it on your face. It works, leaves your skin less oily, i like it. And the book is so little that you can put it in your purse and use it everywhere!

Y por último, los papelitos de polvos de arroz, tengo que decir que nunca había probado un producto parecido, me ha encantado el formato tipo libro, así lo podemos meter en el bolso y usarlo en cualquier lado. Sirve para quitar la grasa y los brillos de nuestra piel, simplemente tienes que aplicar el trocito de papel con la cara del arroz en tu propia cara y eliminar el exceso de grasa. Funciona muy bien, te deja sin brillos en la cara, es un buen producto. 


Resum/Conclusiones:

Pros: the products are natural, it last all day long, they are really pigmented // los productos son naturales, duran todo el día, su pigmentación

Cons / contras:  it's not actually a cons but the paper where are placed the ingredients and the brand name on the lipsticks in my opinion should be stick to the packaging cause sometimes when you open the lipstick that paper falls // no es realmente un contra pero es algo que se podría mejorar, a mí entender, el papel en el cual te ponen el nombre de la marca y los ingredientes de los pintalabios debería estar sujeto con pegamento por que cuando lo abres suele caerse.


Quality / Calidad: *****

Package / Aspecto del producto: *****

Use / uso: *****

I recommend them? / Lo recomendaría? YES / SI
I will repeat with the product? / Repetiría con el producto? YES / SI
*max 5 stars / máximo de 5 estrellas

domingo, 7 de septiembre de 2014

Flashmob Cosmetics II


Hello darlings!!

Today i'm gonna speak about some Flashmob cosmetics, i told you in another post about this new brand which is pretty cool and colorful, perfect for the summer! here is the link about the makeup bag full of goodies http://instabeauty89.blogspot.com.es/2014/06/flashmob-cosmetics-flashmob-cosmeticos.html .

Hola preciosuras!

Hoy os voy a hablar sobre algunos productos nuevos de Flashmob cosméticos, es una marca de la que ya os había hablado anteriormente en otro post cuando os presentaba su maletín de maquillaje, aquí tenéis el link por si queréis consultarlo http://instabeauty89.blogspot.com.es/2014/06/flashmob-cosmetics-flashmob-cosmeticos.html .

In this post i will talk about a set of nailpolishes and a set of hairchalks. The two sets are really cute and colorful.

En este post os voy a hablar sobre un set de esmaltes y un set de tizas para el pelo que ahora están muy de moda. Estos dos set son super monos y coloridos.


First, I'm gonna talk about the nail polish set which contains 4 nail laquers in white, pink, yellow and orange, and 3 pots of glitter in pink, yellow and orange too. The lacquers are really pigmented i only use one coat in the swatch down below and you can pretty see the color, there are only the bright colors. You can use the white lacquer to amplify the colors as the box says, so you could use them alone or with the white underneath just like it was a primer on your eyes to make the lacquer brighter. It covers perfectly the nail and the brush is really good, it's pretty easy working with it and having and amazing manicure. They last a lot on your nails  at list one week and a half or so. Also in the pack, you have glitter which you can use it to make a decoration on your mani. To apply the glitter you just need to put a coat of your top coat and spread the glitter on it, clean the excess and that's it. If you want you can apply some top coat on it to fix it and make it last longer. Like a told you in the other post, when there is glitter involve, you have to think of a mess jajaja so, be carefull and spread the glitter in a surface you where you can put all the rest together.


Lo primero de lo que os voy a hablar es el set de manicura que contiene 4 lacas de uñas de colores tan llamativos como el rosa, el amarillo, el naranja y por último, el blanco. También, podéis encontrar en el set un conjunto de 3 botecitos llenos de púrpurina de diferentes colores como el rosa, el naranja y el amarillo. Los esmaltes son pigmentados, sólo he usado una capa en la foto que os adjunto en el post, podéis ver lo bonitos que son sin haberme puesto una capa de blanco debajo, he pintado directamente del color. Duran bastante puestos, a mí en concreto me han llegado a durar una semana y media sin que se esconchen. En la caja nos advierten que podemos potenciar el color pintando primero de blanco la uña y despúes del color que queramos entre los que nos ofrecen, sería algo así como ponernos una prebase para sombras en los ojos. Éstas lacas de uñas cubren bastante bien y la brocha es buena, no suelta pelo y ayuda a crear un mejor acabado, es bastante fácil trabajar con ella y que la manicura nos quede perfecta. Para aplicar la púrpurina podéis aplicar una capa de vuestro top coat y echarla por encima, tened mucho cuidado, por que jugar con púrpurina es igual a lío asegurado jaja se llena todo de brillantitos, así que poneos en un sitio donde podáis manejar el exceso y no se exparza por todos lados. Una vez veáis que está seco y no se caerá toda, quitad el exceso y voilà, ya tenéis vuestro diseño. Si queréis que os dure más, podéis aplicar de nuevo encima el top coat.


The second set is for your hair, you have 3 different pots full of hair chalk, i got the orange, pink and purple one. The colors are so pretty, vibrant and really pigmented. You can see the instructions on the back of the box, you can see how you can change the color of your hair into this ones. You just need to make different sections of your hair and put the hair in the pan between the chalk and the sponge then slowly move the pan down and let the color chalk tint your hair, and voilà you have your hair color change. Its so simple and it last until you wash your hair. Notice that is not permant so you can change the color how many times you want, isn't it gorgeous??


El segundo set que os voy a enseñar es para el pelo, son unas tizas decolorantes que están muy de moda ahora mismo, el pack que tengo yo lleva 3 distintos botecitos de color naranja, rosa y lila, son monísimos! En la parte de atrás de la caja os vienen las instrucciones para poder realizar la decoloración y son super sencillas. Solo tenéis que coger una sección de vuestro cabello, que no sea muy grande por que tiene que caber en el potecito, introducís el cabello entre la tiza y la esponja, esto es muy importante, por que si no lo hacéis así, no os tintará. Después solo tenéis que mover despacito para abajo, dejando que la tiza haga su trabajo. Qeda super colorido y pigmentado y os durará hasta que os lavéis el pelo, recordar que no es un tinte permanente dura lo que vosotras queráis y se quita con agua, así de sencillo. Podéis llevar cada día el pelo de un color, es genial no creéis?


Resum/Conclusiones:

Pros: amazing colors (colores preciosos y vibrantes)

Cons / contras:  none (ninguno)


Quality / Calidad: *****

Package / Aspecto del producto: *****

Use / uso: *****

I recommend them? / Lo recomendaría? YES / SI
I will repeat with the product? / Repetiría con el producto? YES / SI
*max 5 stars / máximo de 5 estrellas